
Its a simple fact of online marketing that website rankings and thus traffic do not happen by themselves. Working to improve the on-page SEO as well as external factors of your business website is an ongoing process for successful digital marketers. Try this SEO audit to get started and with SEO you will learn how to fix slow-speed pages.
One of the fastest ways to enhance your website rankings is to conduct an SEO audit.
You may think it sounds complicated, but it’s actually quite simple.
My SEO audit checklist for 2017 is the easiest and the best way to find out:
- What condition your blog is in
- What problems exist
- What your advantages are
- How to use SEO basics
- How to increase traffic
Table of Contents
Choose your SEO Audit Goals
The most important stage is defining goals, including what to expect following an SEO analysis, and what an SEO analysis can do for you:
- finding technical problems
- optimizing content
- using all the bonuses from SEO
- identifying poor posts
- improving the best that you already have
- increasing loading speed
- increasing traffic
Every blog owner, like in any other business, must clearly understand his or her goals. The ultimate goal, of course, is profit — at least for most bloggers. And profit directly depends on traffic and the conversion of visitors into buyers.

You should clearly understand what unique features you offer, and how you’re helping users resolve their issues.
In other words, what answers are users looking for when they visit your site?
If you having a hard time defining your goals, start by answering the following questions: Who is your visitor? Who is going to follow all your tips and guidelines?
Write a small description of your target user.

The easiest way to identify your target user is by using Google Analytics.
Browse through the Audience section, and take a look at the subsections as well: Demographics, Age, Gender, Interests, Geo, and others. Find out which countries the majority of your visitors are from, and their average age and gender. Make a portrait of your average user.
Find out which devices readers use when they visit your blog.

From the search query, users can access a search engine to your article, in which they perform a number of tasks and come across a lot of obstacles. Our task is to help people overcome those obstacles and play by the rules of SEO.
To understand what stage you are at, you should measure and monitor everything as much as possible. And do not forget about your ultimate goal!
Write it down, draw it and make sure to keep it in a place you’ll remember. After all, we often go astray and forget our destination. The best way to stick to your path is to visualize your ultimate goal. Divide it into stages and focus on each of them separately. Doing everything at once is simply unnecessary. This, however, is the biggest mistake of not only beginning bloggers but of the pros as well.
Chrome extensions like List Goal from Bryan Harris, designed to track the number of email subscribers to your blog, will be great assistants.
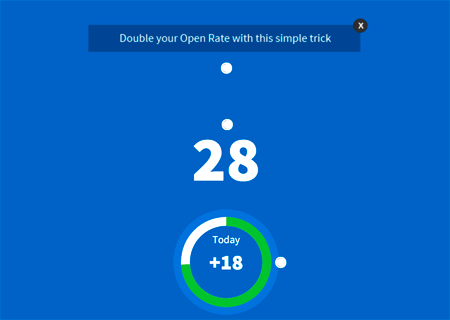
You will not only see how many new subscribers you have each day, but you will also receive superb advice on how to continue gaining traffic.
In this post, I’m not going to tell you how to increase your income. That is a topic for another article.
I will only give you brief advice: That you must understand who your visitor is, what he wants most of all from your blog, and how to give it to him. Involve him in your funnel; encourage him to develop from a visitor into a subscriber, and consequently into a buyer. Constantly adjust your sales funnel, track the results and improve each stage.
In this post, I’ll tell you how you can increase the traffic to your blog following an SEO audit.
Identify the problems affecting your blog
What I love about sites and blogs is that they give us indispensable friends who are always ready to help us.
And these virtual friends are not in our immediate family, our own friends or our neighbors.
They are web tools!
Of course, you may get confused because of their number and purpose.
Believe me, you don’t need dozens of tools in order to achieve the best results.
The main assistant here is you yourself! And only then can you take advantage of these Internet soldiers:
- Google Analytics
- Google Search Console (former Webmasters Tools)
- Screaming Frog
- Ahrefs / Semrush
- Buzzsumo
- Google Keyword Planner
- KWfinder.com
- Keywordtool.io
Step 1. Check all your blog pages to find out which ones are visited the least
Sign in to your Google Analytics account (or install it, although I sincerely hope you already have).
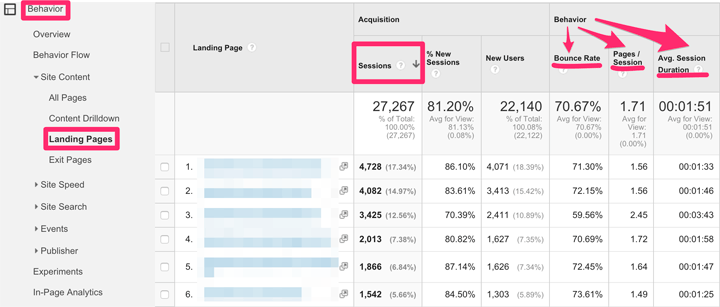
Go to Behavior > Site Content > Landing Pages. Click on Sessions to sort out the results.
Open these pages and look at them through the eyes of your user (remember your target user) or ask a friend to look through them for you. Sometimes we don’t notice even the most obvious mistakes, so an objective view may prove very helpful.
The reasons behind poor performance will likely include the following:
- A vague answer to the user’s question. He cannot find the information he expected to find
- Bad headings and subheadings. Most of us are scanners: We glance through the article, and if nothing grabs our attention or it is unclear, then we close the site and continue surfing the Internet.
- Low-quality content.
- Inadequate media content.
Step 2. How to correct common blogging mistakes
What can we do to correct our blogging mistakes?
Access several of your competitors’ sites in Google (three is enough) upon the request leading to your particular page. Study them, or at the very least glance through them.
Take note of the following:
- The length of their posts.
- The amount of media content (images, videos, slides, etc.).
- How they wrote their headings and subheadings.
- How they formatted the text for readability purposes.
For example, compare these:
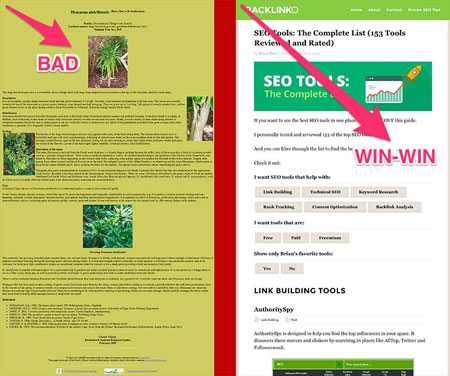
Can you see the difference? Which page would you spend more time on?
The answer is obvious, isn’t it?
Steal the best from your competitors (I’m talking about the style in which they present their information), and adapt it to your own style.
Your users will be forever grateful.
Step 3. Use help from Google Search Console
To do so, you will have to go to the section marked Search Traffic > Search Analytics.
Tick Impressions, CTR, Ranks. Under Dates, select the past 90 days to see the results for a greater period of time.
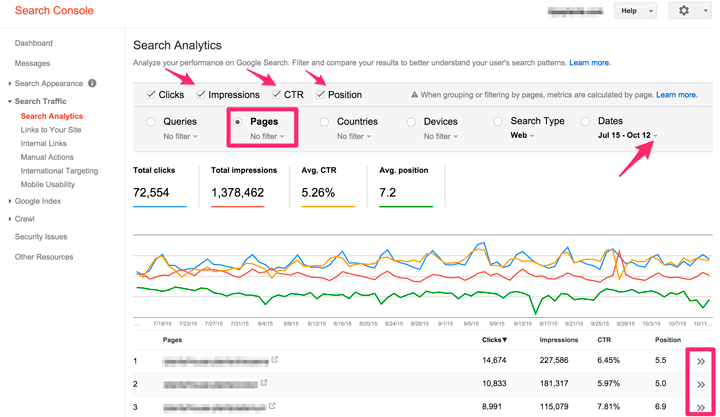
A list of all pages will load on default, sorted out by the number of clicks. You can find individual pages by going to Pages and then-No filter and specifying the URL needed for the analysis.
I will give you one more quick tip to increase your traffic using Search Console:
You can see all the keywords of any of these pages by clicking on >> opposite the page and selecting Queries there.
And then what?

The pages that have a high number of impressions and good ranks, but a very low CTR compared to others, deserve separate attention.
Look at the keywords that lead to this page from Google and open several of your competitors’ pages upon the same requests. Find out what’s the matter, and why so few people are clicking on your blog. Perhaps your Title, Meta Description, or Snippet are to be blamed. Compare yourself with your competition. Correct your mistakes — the result will certainly please you.
Step 4. Find out which sources provide the least traffic and correct the situation
It is very important to know the main sources of your traffic. This information will help you concentrate on the channels that bring about the best results. (In other words, you have to set goals and keep track of them.)
To find out how your incoming traffic is distributed, go to Google Analytics, in the Acquisition section. Take a look at the data from the sections Channels, Source/Medium, and Referrals.
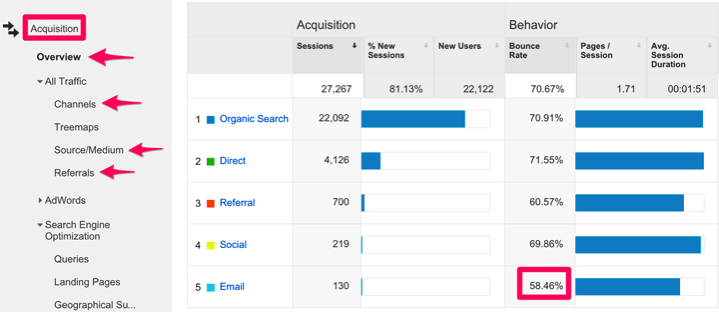
If you have noticed a big difference in these showings — for example, in Bounce Rate in any source — this is your goal. This means that users are partial to your content and that they want to find out more.
As soon as you determine the channels that provide the fewest visitors, you’ll have to proceed with the next step.
Dig a bit deeper and examine the major sources of traffic of your 2 competitors.
SimilarWeb is an amazing assistant.
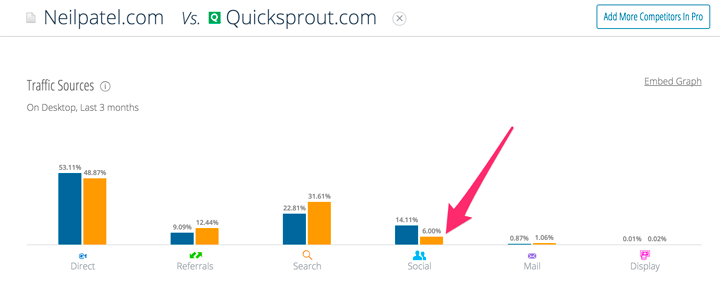
The free version allows you to compare 2 sites. Excellent!
For example, we see that Neal Patel’s personal blog attracts twice as many visitors from social networks as his website Quicksprout.
Conclusion: Quicksprout staff have things to work at, and there is definitely ample room for improvement.
To understand what social networks focus on in your niche, you’ll need to go to a website called Buzzsumo and enter your keywords.

Use all of the data you’ve received to generate a promotional strategy for your blog.
Now you know the priorities!
Step 5. Start by promoting your least-visited blog posts
To maintain a strong blog, you need to identify both its strengths and weaknesses. We do not always write outstanding articles that collect hundreds and thousands of backlinks and sharing. In most cases, our success depends on us. On promoting that which we don’t pay enough attention to.
We write articles in a flash of inspiration and hope that they will be received at their true worth.
But it doesn’t happen this way.
In fact, a lack of content promotion is cited as one of the top reasons behind poor reception.

Just as businesses rely heavily on marketing and promotion, our articles require promotion as well.
The best way to promote your articles is to make friends with the authorities in your niche. If you are a beginner, however, this may prove quite difficult.
If your blog is still young, and if it is not visited enough (and there is no such thing as enough), you can follow these 8 tips on content promotion:
1) Contact all the people you mention in your post. Do so via email, social networks or SMS, which is often forgotten nowadays (in case you know the phone number).
2) Send the news about your new post to all your friends and acquaintances. Simply ask them to help you out!
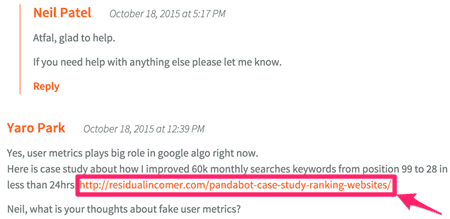
3) Find other blogs in Google with the help of the keywords from your article. Leave a useful comment (100-200 words) with the backlink.
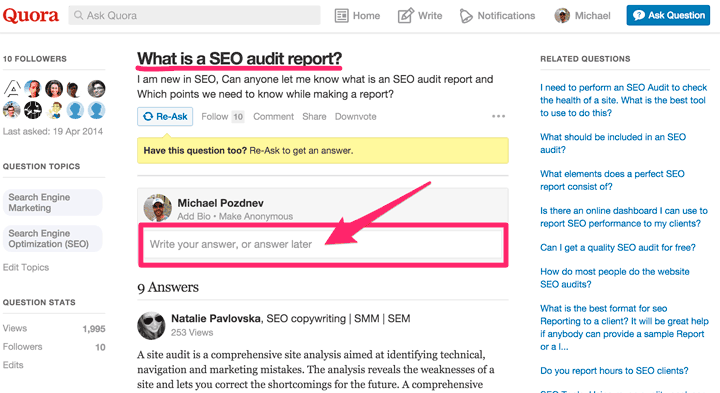
4) Look for the questions in Quora that relate to your topic. Then leave a reply with the link.
5) Write about 3-4 new headlines for your articles and add them to the schedule Buffer (a free version is good enough to start) and share them with your readers on social networking accounts. Do not hesitate to share your old posts as well. If they are useful and stunning, the world must see them!
6) Join the interest groups on Facebook, Google+ and LinkedIn, and help other users by giving them advice. Perfect the style of your replies so that users will want to click on your link and find out what’s next. Add your posts to these groups with interesting headlines and unique descriptions. (It is crucial to attracting user attention — just do not spam!)
7) Open Twitter and set your keywords via the advanced search. You can also mark them in the Other > Question? section. There will be tweets that contain the question in the results.
Such as this, for instance:

You can tweet directly or write a private message with the reply and a link to a detailed description.
8) Buzzsumo is one of the best promotional tools out there. It allows you to find the most popular articles by keywords and to see who shared a post on Twitter, and who gave backlinks to it.
Sort the results out and contact those who shared posts in their tweets and gave links to competitors. Unfortunately, to be able to enjoy Buzzsumo in full, you will have to switch to a paid plan.
If you’d prefer not to spend money, for the time being, you can use Open Site Explorer to obtain similar results.
Increase the traffic of your most popular articles
Even the best articles can be improved!
You need to know your most powerful blog posts — or those that get the most traffic. Our task is to improve them and get even more visitors.
Step 6. Best pages search
Open the Google Analytics page and sort the pages from highest attendance to lowest.
To do this, follow these steps:
Browse through Behavior > Site Content > Landing Pages
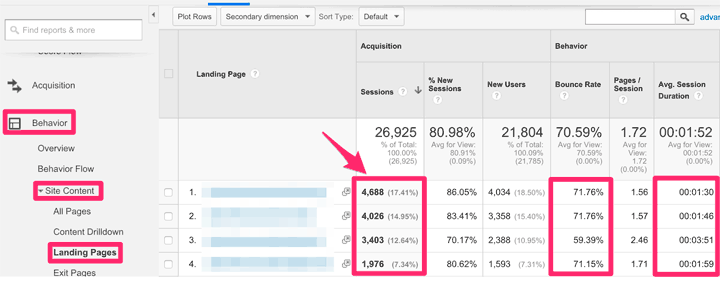
You will get a list of your most visited pages.
Pay special attention to Bounce Rate and Avg.Session Duration. These indicators can often be improved simply by comparing your own articles with those of your competitors. Find the key differences between yours and theirs, and consider what is effective with your competitors (title, formatting, content length, attractive headlines, media content).
Step 7: Add some link juice
In today’s digital world, websites links are one of the main indicators of site credibility. This includes both internal and external links.
A lot of attention is paid to external links. There is no argument that when someone else sends out a link to your blog, he is recommending your content to his users. In terms of search engines, this recommendation is a direct signal to the fact that there is useful material in your article.
But the most interesting thing is that you can also sort your articles by importance.
To do so, you will have to send out the internal links from other pages in the same way.
It’s sо simple!
If you have Top 5 articles that get a lot of traffic, the best way will be to use the links you have to them in your sidebar.
That’s what nearly all the experts do (Robbie Richards, Neil Patel, Brian Dean, Ramsay Taplin).
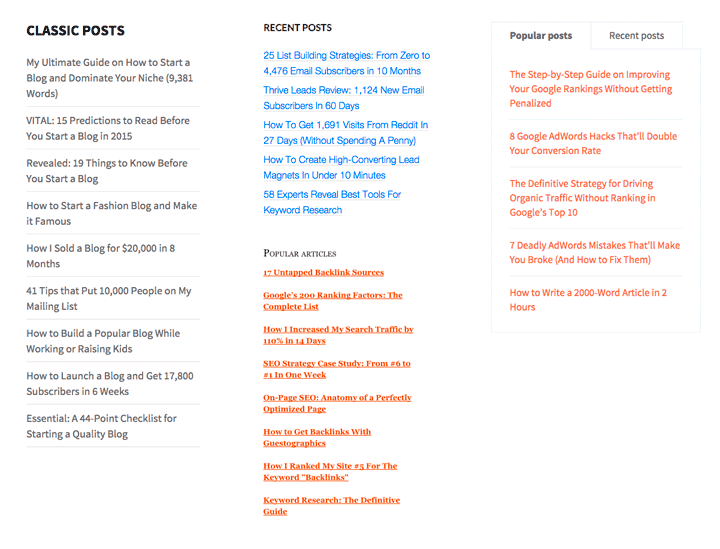
Give your top articles links with different types of anchors (exact-match, partial-match, etc.) from other pages.
According to HubSpot by Matthew Barby, the latest blog-related research, a good percentage of anchor distribution should be as follows:
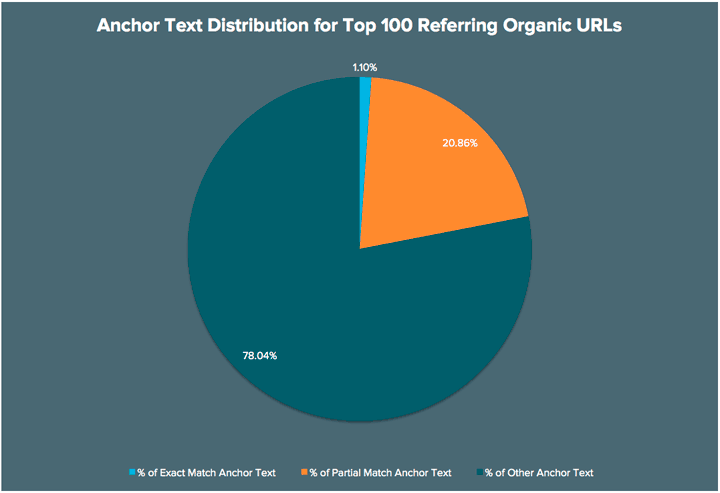
This analysis presents data on the external links. But let me say it again: A link is a link, regardless of whether it is external or internal. Its purpose is to help the user!
Use SEO basics in the audit
These are the fundamentals of SEO, and are not to be forgotten:
- Content optimization: Meta tags, title, headings, keyword research, image optimization, content length, URL structure, loading speed, 404 pages
- Link building: internal links, external links, anchors, broken links
- Competition analysis
Step 8: Check your content optimization
Install a free version of the program Screaming Frog. (There is a version for both Windows and Mac). The opportunities are more than enough to conduct a detailed analysis of your blog.
You can specify either the main page of your blog or upload a list of all your pages. The latter is more convenient since the free version has a scanning limit of 500 URLs.
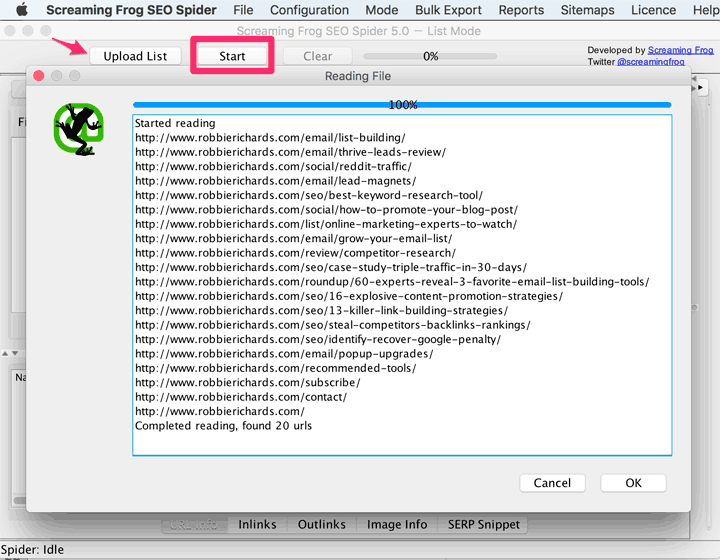
Select Mode > List from the main menu and click on the Upload List button (or simply specify the home page if you want to analyze not only HTML pages, but also images and other files), and load the list of required URLs for the audit.
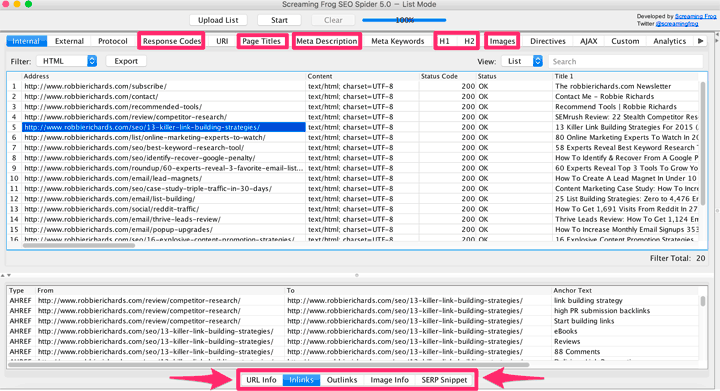
This tool will help with Response Codes, Page Titles, Meta Description, H1, H2, Images, Inlinks (and anchors), Outlinks, SERP Snippet (Desktop, Mobile and Tablet) and many other technical aspects of SEO.
Page titles are very important! According to my analysis of the top 5 blog online marketing experts, Title should be 55 characters on average. Meta Description, similarly, should be about 113 characters. (Be sure to add a strong Call to Action in the description!)

You can check what your pages look like in Google search results. In the lower block, simply browse to the tab SERP Snippet.
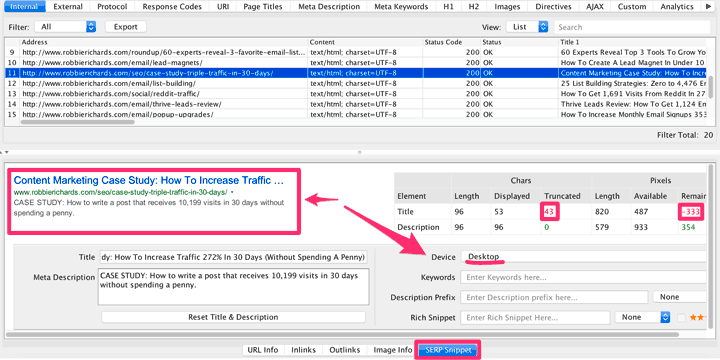
This tool will show you all the defects you’ll need to correct. You will improve the look of your blog not only in the eyes of search engines, but also in the eyes of your users.
Step 9. Add some relevant long-tail keyword variations
Every article needs keywords. In fact, your site traffic depends on how you well you’ve researched your keywords for each post.
But if you didn’t pay as much attention to this as you should have, it’s not a big deal. Every mistake can be corrected.
Let’s just be honest.
This step can be carried out when you really have something to add to the article. And this information should be useful for the reader. You shouldn’t just write parts of the text for the sake of adding new keywords. Playing these sorts of games with Google is quite dangerous.
So, let’s imagine the situation:
You have a wonderful blog post, but your site traffic is low.
You found it in Google Analytics, and now you want to give it some more power.
Great!
Let’s see the keywords, for which some traffic already exists (Search Console), and then choose some seed keywords. (3-4 keywords will be enough).
I love selecting keywords with the help of KWfinder and KeywordTool.io.
Kwfinder lets you find long-tail keywords with low SEO competition.
Insert your seed keywords and press Analyze.

Repeat this action with one keyword after another, and save the results. For this purpose, highlight all the phrases, press Selected add to the list, select Add to a new list, and then click the Add to List button.
You will see the table with the search results of relevant phrases, and the interest to this phrase with the course of time from the year 2004 (excellent information to understand the trend of the phrase).
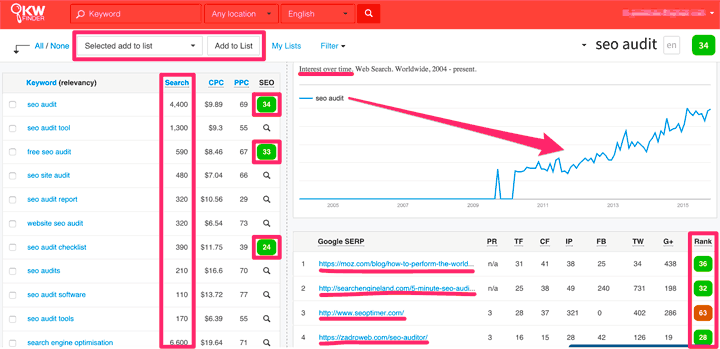
If you click on any of the phrases, the information from Google SERP will appear on the right, with the main indexes (PR, TrustFlow, Number of backlinking, unique IPs and social media data) regarding those who are on top.
The phrase in the SEO column has the value of difficulty of getting on top. These are very useful data for assessing your possibilities.
Of course, if your blog is already up there with the pros, then you can fight for high-frequency keywords. And if you are a beginner, it’s better to choose phrases of lower value.
The free version is enough to analyze 3-5 phrases a day. Make sure to choose low competition keywords.
Keywordtool is also a great way to search Google keyword suggestions. You can also search the requests on YouTube, Bing and in the App Store.
I really like that you can immediately get the variants of users’ questions in the results. In order to do so, you should choose the tab Questions. That’s all there is to it!
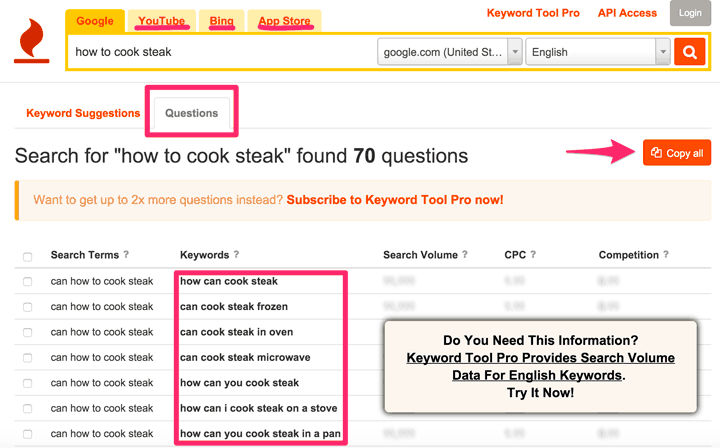
You just need to copy all the results and see the average monthly searches on Google Keyword Planner.
Choose the most suitable searches for your topic keywords.
Then see their competition in the search results. The easiest way to check it is by installing the MozBar extension in the Chrome browser (Register in Moz to access more possibilities.)
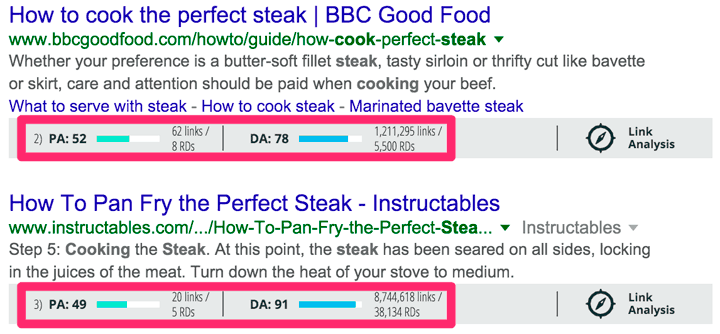
Check all the keywords that you got in such a way and leave those keywords that have less competition (DA and PA values of competitors are the lowest.) These are our target keywords.
Write at least 100-150 words to describe each phrase.
Download this step-by-step checklist to perform your own SEO audit.
How to conduct keyword research for the article you don’t know about yet
Recently I’ve learned about a new tool which can become an indispensable assistant of any SEO-expert or blogger.
It is Serpstat.
I’ll tell you only about one of its features.
Very often we do not know what to write our new articles about. Sometimes we have a lot of ideas. Sometimes we experience writers’ mental block.
In both cases, Serpstat will be able to help you.
No doubts, you know your competitors. Perhaps you even have a prepared list you sometimes refer to so as to find out what’s the news with your rivals. After all, who is aware is forearmed!
About the search of new ideas for your blog posts with a prepared set of keywords (relevant, synonyms, LSI, and so on).
Simply enter the URL of your competitor on the home page of this service.

Next, scroll down a bit to the bottom and find the area “PAGES WITH THE HIGHEST VISIBILITY”.
<
Thus, you will find out which of your competitors’ pages are the most popular and are likely to bring them the most visitors.
Click on any of these pages of your competitor and find out on which keywords he gets organic search traffic.
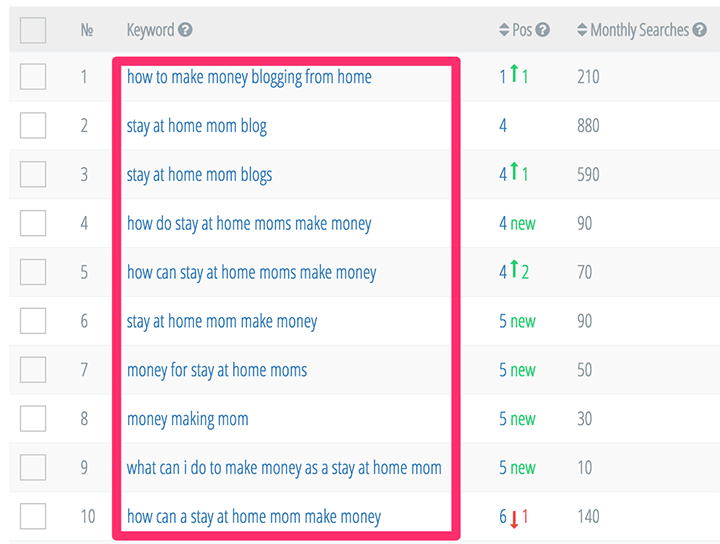
Boom! And ready.
You have a new idea for your article + a ready-made set of keywords and relevant phrases to be used.
Step 10. Search for technical errors
Switch to Google Search Console account to Crawl > Crawl Errors.
If there are errors, correct them. In most cases, these are nonexistent pages with the 404 error. Correct the URLs of these pages or place redirects for the necessary information.
The 404 page is very important for you. That’s where the visitor gets once he or she inserts incorrect information or follows the wrong link to your blog.
Optimize it.
Add a powerful CTA not only to avoid losing the user, but also to get him or her more involved — for example, to transform the user into an email subscriber.
Look what a wonderful 404 page Bryan Harris has.

To search HTML advice from Google itself, go to Search Appearance > HTML Improvements.
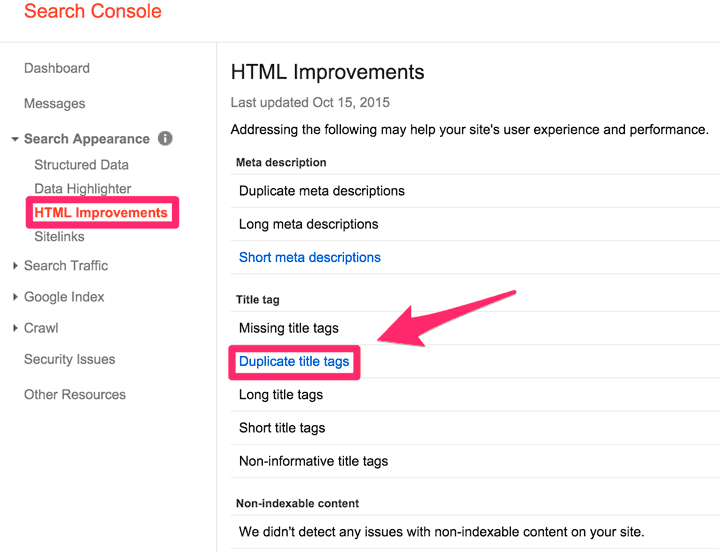
Here you can find all your duplicated Titles and problems with Meta Descriptions. Also, you can find duplicates of your pages here, since they are likely to have the same Title.
Just click Duplicate title tags and you will get a list of all such pages.
All you have to do is eliminate these mistakes
A good way to correct your mistakes is by indicating the tag canonical as a means of showing the search system which page is the main one.

Another excellent and free tool is the Online Broken Link Checker. It helps find broken links on your pages and other sites.
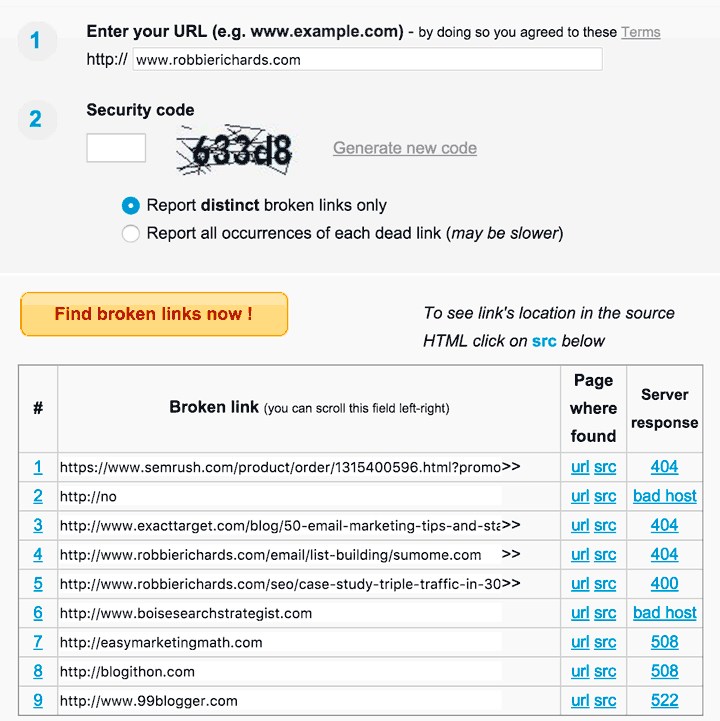
Just enter the URL of your blog’s main page and start the error search.
As a result of the check, you will get a list of broken links. By clicking on the URL in the table, you will be able to access the page where the link was detected.
Then all you have to do is correct or delete these broken links — that’s all!
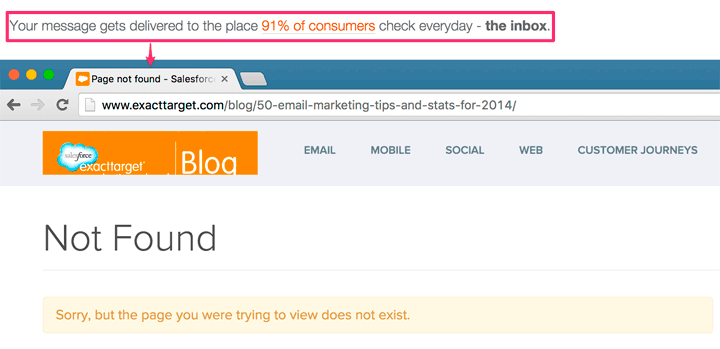
Indeed, in Robbie Richards’s post 25 List Building Strategies: From Zero to 4,476 Email Subscribers in 10 Months, there is a broken link that leads to a nonexistent page.
Step 11. Creation of a link profile for your blog
There are both good and bad links.
Spam links from irrelevant sites can be harmful to you, so it’s better to get rid of them. You’ll be informed of the majority of them by Google in the message Search Console (Don’t forget to check them periodically, you can get a lot of useful information.)
The easiest way to check whether you have bad backlinks is to use the OpenLinkprofiler tool.
The free version is enough to see all incoming links and to detect the bad ones, which negatively influence your blog.

It’s quite a useful tool, as it gives you more than enough information on backlinks (For example, turn on signal for new links).
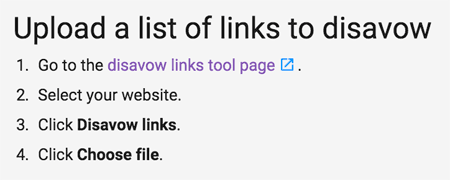
Then you need to inform Google that you no longer want it to take certain backlinks into consideration in its algorithms.
For this purpose, you need to go to the disavow links tool page and upload your list of undesirable links.
When you promote your articles and place links, pay special attention to anchors (the text of links).
Don’t overuse the exact match of a keyword, and always think about the user first and foremost. That should become your point of departure. Make it clear to the user what he’ll find when he clicks your link and goes to your page.
Google has more artificial intellect than ever before, and it does everything possible to make it impossible to manipulate. However, it doesn’t prohibit you from contacting other sites’ owners, from writing or from completing any other work regarding the growth of incoming links.
If the link is natural, and if it’s on a relevant or a powerful site, it will not be harmful on the condition that its purpose is to help the user answer his questions and access additional information.
No modern webmaster can do without a set of tools, although most are commercial and cost quite a bit of money.
So, what should beginning bloggers do? Especially if their blogs have yet to make money.
Always use the free versions of these tools!
I haven’t seen programs without a trial period, or at least a limited (but free) set of functions for quite some time now.
When you work with links, conduct an analysis of your competitors, or perform an audit of your blog/site, there is a wonderful tool called Semrush.

If you have yet to register there, do so right now!
You will discover dozens of possibilities for analysis, and you’ll get a FREE assistant to help increase your traffic.
Step 12. How can Semrush help analyze your link profile?
It can present you with potential new links to add to your piggy bank.
Use Backlinks Comparison.
Semrush gives you the opportunity to compare the backlinks of up to 5 domains. For example, compare the backlinks of your blog with those of 4 competitors — and it’s all free! You will see immediately what is worth striving for. More links don’t necessarily translate into better links. The important thing is quality, which is why you ought to pay attention to Page Score in Semrush.
Enter 5 domains and launch your comparison.
As a result, you will see something like this:
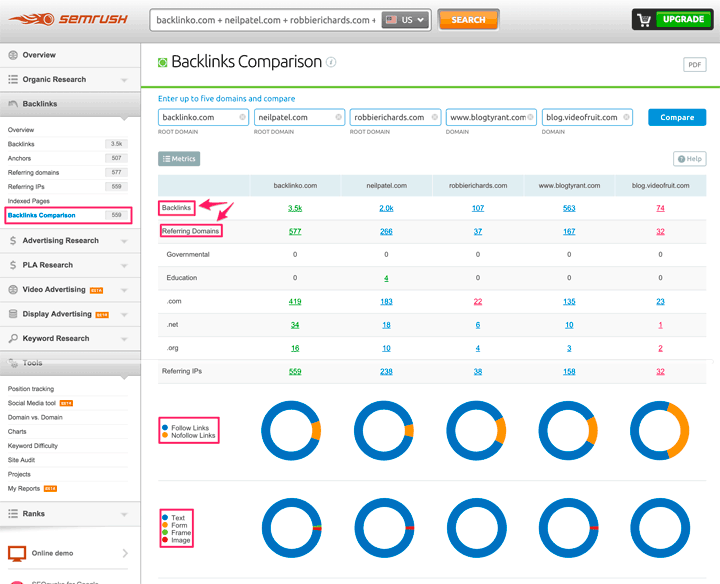
You can find out what particular domains or pages give links to your competitors. You can see up to 11 links for free, which is more than enough. This way you’ll get 55 possible variants of adding the link to your wonderful post. Log in the next day and enter 5 more competitors, and so on and so forth. Find out page owners’ contact details, and send them a short message by email or on social media.
Of course, before sending them these messages, perform a minimum set of actions:
- Subscribe to their social accounts
- Post useful comments
- Retweet or like their posts.
The best option is to develop mutually beneficial relationships.
If you are asking the owner of another blog for something (and if his blog is much more powerful than yours), you should make sure to do something in return.
Step 13. Always keep an eye on your competitors
In the modern world, millions of new blog posts appear every day.
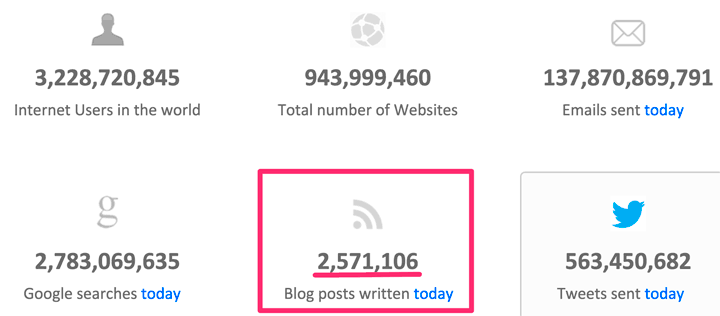
It’s hard to be the best if all you’re focusing on is posting high-quality content. It is certainly possible in the spheres where the competition isn’t too high, but it’s not likely.
So, what to do when your traffic stagnates?
The answer is simple!
Look at the best and use their tactics. Take the best from the top bloggers you follow and personalize their methods.
In the previous stages, we found out how to look at your competitors’ backlinks and apply them to your own blog.
Now I will tell you how to use others’ content for your own purposes.
Step 14. How can your competitors’ content help you?
Let’s imagine that you wrote a wonderful article that attracts minimal traffic. You found it via Google Analytics. You found out that users like it, as they’ve been spending quite a bit of time on it.
What should you do next?
Make a list of keywords that lead to this article from Google.
And again, Google Search Console in the Search Analytics subsection will help you.
Install the radio button for Queries and enter the URL of the page in question with the help of the filter in Pages.

Download csv file with the results (Download it at the bottom of the page.)
We have to get a list of keywords that occupy positions 5 to 9 (The positions of these phrases will be the easiest to improve.)
Let’s also exclude the least clicked phrases.
All of this can be done quite easily in Excel, by applying filters (Highlight the first line, click on the icon ![]() and then specify the conditions in the column Position and Clicks.)
and then specify the conditions in the column Position and Clicks.)
Preferably, include no more than the 5 most important phrases.
Install the SEOquake extension for Chrome (This will give you a wide range of possibilities for the audit of both your blog and your competitors’ blogs, and it’s a great analog of MozBar.)
Then we’ll go to Google and enter the first keywords. We’ll open all sites with a higher position than your site and look at how they differ from your page.
Our purpose: To define the content length. In order to do so, we use SEOquake (Open the menu by right-clicking it and select Page Info.)
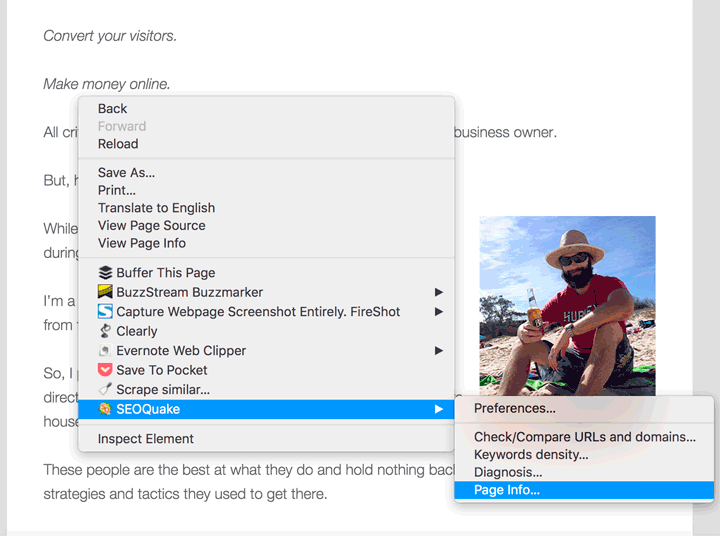
A new tab will load. We are interested in the number of words on the page, as well as their density.

Open your competitors’ pages based on these 5 select phrases, and take note of the number of words they’ve used.
In doing so, you will analyze the content length of your competitors. If the difference in the number of words is noticeable, you should add some more information to your article, explaining the questions in a more detailed way.
In the SEOquake results, pay attention to the DENSITY tab. Click on it, which you can do from the context menu, by choosing Keywords density.
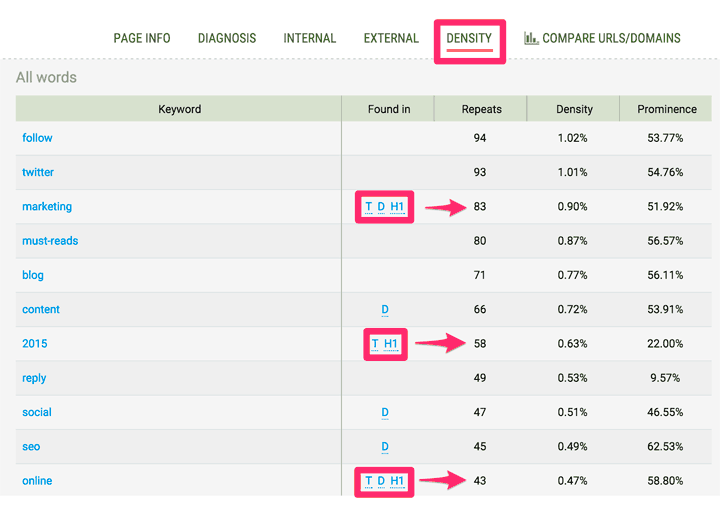
All words with the corresponding statistics not only in the content but also in the Title, H1, Meta Description are here. It’s very useful information when it comes to analyzing your competitors’ blog posts.
Add new relevant phrases to your article, including them in the smoothest way possible. Don’t try to manipulate or play with the search systems. Add these phrases only if you have more useful information to contribute. Take care of your readers and your own security!
A quick piece of advice: This same information can be used when you create a new article. Examine the materials of your competitors! What words do they use? Often, that’s the best way to choose your ideal relevant phrases and synonyms. Your competitors have already done the work, so make sure to learn from the very best!
Speed Up Your Blog
You can get the main problems and recommendations on improving page loading speed in Google Analytics.
Step 15. The quick growth of blog’s loading speed
- image optimization
- new hosting
If you are a beginner, my simple advice is just for you:
Go to the section Behavior > Site Speed > Speed Suggestions.

As you can see, there are 2 issues here:
- Reduce server response time
- Optimize images
Step 16. Reduce server response time
It is possible to reduce server response time with the help of CDN (Content Delivery Network), or by changing hosting.
Most bloggers use cheap hosting pricing plans for their blogs without renting dedicated servers. That’s why we (myself included) have to put up with slow loading speeds on the pages we visit.
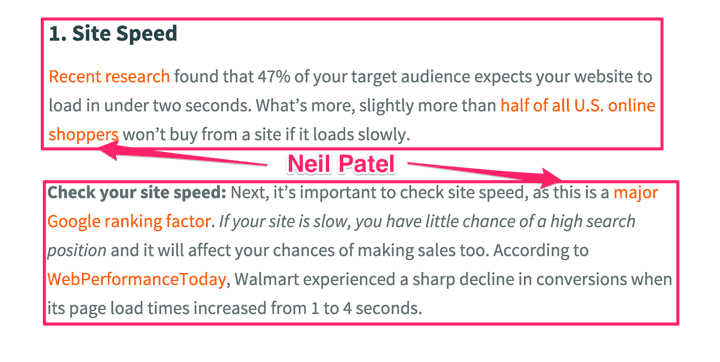
But this is not as important as it used to be. I would argue that the page should be loaded within a couple of seconds, as most people advise.
Here is what Neil Patel says on the matter:
Personally, I think that when a blog is still new, it is not necessary to spend a lot of money on a dedicated server. The opportunities offered by our pricing plans are more than enough. It is within our power to only choose the right hosting providers for us.
Assess the loading speed of our pages. For example, here:
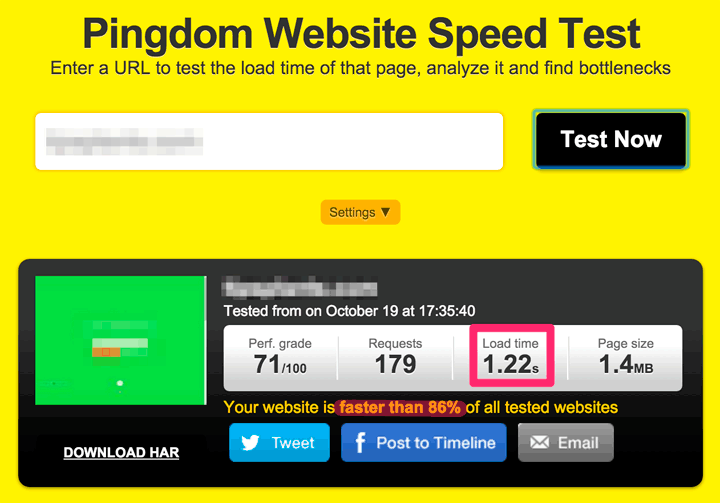
Make sure to read the words of advice this tool offers, below on the page. You will be able to apply some of these tips on your own.
One of my favorite ways of selecting a host for my projects is simply to look at my competitors.
If you have a list of your competitors already prepared (and every blogger should have such a list!), check what hosting they chose.
This way you can see that my blog’s hosting is on SiteGround.

Then find out the loading speed of some of your competitors’ pages in Pingdom. Choose the winner, and then pack your files, databases and get ready to move. Of course, only do so if you think that it is necessary (for example, if the loading speed indexes of your pages are far slower than those of your competitors).
Step 17. Optimize images to increase traffic
Images are by no means a less significant part of an SEO audit.
The faster your site will load, the more satisfied your visitors and the search systems will be.
Now it’s time to help your images lose some weight.
When you check your pages in PageSpeed Insights, you’ll see a list of recommendations from Google regarding which images can be reduced in size.
Let’s check the indexes of the post 25 List Building Strategies: From Zero to 4,476 Email Subscribers in 10 Months by Robbie Richards.
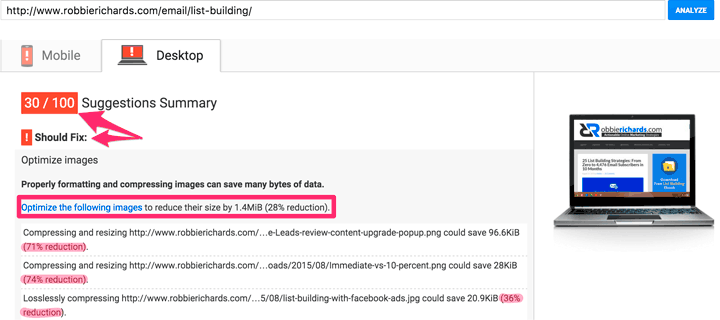
As you can see on the screenshot, the general index for Desktop is 30.
It’s a very low score, out of 100 possible points. And the first tip from Google is to optimize your images. Compression can help to reduce the size of your image files by 1,4MiB!
In the case of a correct images optimization (the keyword in the name of the file and ALT tag, files compression), you can gain substantial traffic from search systems.
Help the search machine understand the context of your page.
It’ll undoubtedly become a bonus for your SEO.
We use images quite often because visual information is perceived 60,000 times faster than written information.
Neil Patel recommends using visual elements once every 350 words at the very least.

My analysis of his blog posts reveals that on average, Neil inserts one image for every 97 words!
But high-quality photos tend to be larger in file size. Without optimizing these files, we increase the loading speed of our pages.
There are 3 variants of image optimization:
- optimization of image file size
- optimization of the image file name
- ALT tag with the description of what the image tells us
Optimization of the image file size is easy
Personally, I prefer to optimize each image manually in Photoshop (using Save for Web). That’s how I control the quality of the image while compressing it to choose the best format (gif, jpg or png).
If you don’t have Photoshop, you can use plugins for WordPress and other web tools.
You can also use free image compression services such as:
- Compressor.io
- Compressjpeg.com
- Jpegmini.com

They will help to reduce image size by up to 80%, without compromising the quality of your images.
It’s up to you, whether to use plugins, to perform optimization and image compression yourself, or to use web tools. The main thing is to remember that the quality of your images must not be compromised!
Don’t forget that any plugin will slow down your blog a bit. That’s why you may want to limit your desire to solve every problem with the help of a plugin.
Advice: Use the keywords (relevant or synonyms) in the name of the image file and in the ALT tag.

Step 18. Carry out an audit of your security
Throughout all my career connected with the development of various websites, there have been attempts of attacking these projects all the time. It seems as though nobody needs your blog and access to it.
Trust me, hackers do need it!
There will always be a villain who will want to harm you or take advantage of your blog. Typically it will be a virus. The purpose can be anything, so our task is to do everything possible to prevent attacks of your WordPress blog.
Give special consideration to this matter. It’s better to do it at the setting stage since almost immediately there will appear someone who will want to attack you.
Normally these are automatic bots that find out about new blogs.
There was an attempt of hacking my blog 2 days after I had installed it. They tried to guess the password in the admin zone. But since I have prepared for it (installed plugin Limit Login Attempts, Sucuri Security and followed plenty of other safety tips), now I only watch when someone is trying to hack me.
Be sure to make backups at least once a week and always have a master version of your blog ready at hand (you must be sure that there are no viruses there).
Don’t make the life of hackers easier. Even basic protection will help you avoid 99% of attacks.
Conclusion
Performing an SEO audit is very useful for both your blog and your competitors’ analysis, in order to apply the very best to your site, and to get rid of all unnecessary things.
The majority of problems you’ll encounter are technical in nature. That’s why it’s quite easy to say goodbye to them — once they’re resolved, you’ll never have to deal with them again. And, of course, you shouldn’t refuse the bonuses that an audit can offer.
Don’t be lazy — analyze your website!


CONNECT WITH US!!